Lighting Tips for Home Photography
Photography is a very difficult and competitive field, but it’s possible to improve your own home pictures with a little training and some clever lighting techniques. “A trick of the light” is more than just an excuse; proper application of soft light, hard light, shadows, and positions can bring your home photography to life. Be warned, once you improve your own pictures, you’ll be handed the camera at every event with friends and family.
Soft Light

Even lighting with few highlights and fewer shadows, soft light gives a photo a more natural look that’s often sought afte. And it’s this type of light that is cast by the golden hour (the soft reddish light given by the sun just after sunrise or before sunset) of daylight. However, the lack of shadows and highlights does run the risk of making your picture look flat or uninteresting. Many tricks and techniques have been developed to replicate soft lighting because of its natural look.
So how can you create soft light outside of a studio and inside your own home?
• Use a broad light source. Using a light that shines over a larger area creates a more even light pattern that’s less intense. Keeping lights closer to your subject makes the light relatively larger and gives you a broader light source.
• Place a diffuser over the light source. Diffusers scatter the light source to cover a larger area and create a broad light source with even distribution. Placing translucent plastic, white fabric, or wax paper over a light will diffuse it.
• Reflected or bounce light will also create a broader, softer light. Aiming a narrow light (such as a spot or narrow flood light) at a wall or matte reflector will scatter the light over a broader area.
Hard Light
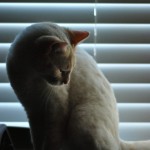
With sharp shadows and glaring specular highlights, harsh light gives a more unnatural look and feel to an image, but is used extensively for glamor shots and creative emphasis. Hard lights typically create a lot of shadows which can be very distracting in a photo. The strongest natural hard light is the noon-day sun which casts a very blue light on things. Creating hard lighting uses a more focused light than the broad sources of soft lighting.
Here are some tips for creating hard light for your photographs:
• A narrow light source intensifies the light on your subject, creating highlights and shadows with very hard light. With a narrow light source, the shadows and highlights improve contrast and textures because more of the light rays from the source hit a smaller area of the subject.
• Putting your light source further away creates a narrower light source because it becomes smaller relative to your subject. For a more dramatic shot, place a strong lamp or flood light further away from what you want to photograph.
• Bounce light can also be used for hard lights. The difference is in how the light is reflected. A shinier surface will reflect and amplify the light source to focus the light on specific areas of your subject for creating dramatic shadows or bright highlights. You can add to the effect by using a crumpled aluminum sheet, spread out as a reflector, to create sparkly highlights.
Shadows and Source Location
Light placement can also have a drastic effect on the look of your photos. As with a hard light source, shadows create depth in your image. Since a subject receives less light when further from the source (this is known as fall off), you can create contrast and depth by placing a light closer in or further away. Mixing this effect with shadows can also create a more engaging picture through changes in the direction of the light, shadows, and fall off across the subject.
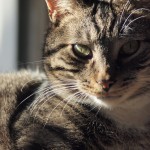
Moving your light source will change the emphasis of your picture. A front-lit image, similar to a soft light, will de-emphasize textures. Moving the source off to the side, or placing it above or below the subject will create shadows and depth which emphasize the texture of the subject. The greater the angle of the light source, the more the texture will be emphasized.
Softer lights will create a more even and natural look. Using a diffuse light from the front is the simplest way to create a clean portrait image for a youthful and professional appearance. Glamor shots are trickier and often done with lights above and to the side for creating contrast and sharp shadows. This kind of shot can be more dramatic but emphasizes textures which looks great for pets and foliage but can also emphasize wrinkles.
 RESOURCE