How to Install Track Lighting
track lighting is a good choice for any room because it’s
so versatile. That versatility comes from the track itself: it provides
electricity at any point along its length, allowing you to freely position
the lights. You can easily place the track on the ceiling or high on a wall, and then direct the lights, called “heads,” to illuminate nearly anything. In a tight space, the heads cast light on
hard-to-light areas. Above a desk or workbench, they make great task lights.
Use them to “wash” a wall or accent a piece of art, to light a long
narrow hallway or work area or to take care of any other spot-lighting chores.
track lighting has its roots in theater spotlighting, and fixture styles
range widely. You’ll find square, round, high-tech and all kinds of specialty
heads that deliver light just where you want it. To cast a narrow beam of
intense light, consider low-voltage lamp heads with halogen bulbs and
built-in transformers. To concentrate the light, choose a lamp head with a
cowl or sleeve that hides the bulb and narrows the beam. A spotlight without
a cowl casts a wider beam, depending on the type of reflector bulb you
choose.
Do It Yourself or Hire a Pro?
Running track lighting from an existing ceiling box is an ideal
do-it-yourself project. Modular components track sections, connectors and
lighting heads make it easy to suit the installation exactly to your room. If
there’s no existing fixture to replace, however, you’ll need a new outlet box
and switch, along with the wiring to make them work. That’s a job for a
licensed electrician. Once the wiring’s done, however, you can easily install
the rest yourself. Just make a simple connection to the ceiling box, and then
attach the track to the ceiling. Installing the heads in the track by
clicking them into place completes the project.
Step by Step
1. Identify the parts. Most track system connections look like the
ones shown here. However, take time to read the instructions and look at the
parts that came with your system. Our drawing shows a “wire-in” connector
that brings power to the end of the track. You can also get a
“floating” connector that provides power at any point on the track.
Whichever kind of connector you get, the connection to the house wiring is
the same.
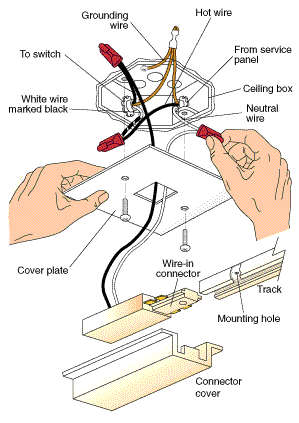
2. Remove the old fixture. Flip the wall switch to check that the
light is working, and then turn off the power and flip
the switch again to be sure that the power is indeed off. Now remove the old
fixture carefully. Once it’s hanging below the ceiling box, test the circuit
with a voltage tester to make sure no current is present anywhere in the box.
Then disconnect the wires from the old fixture.
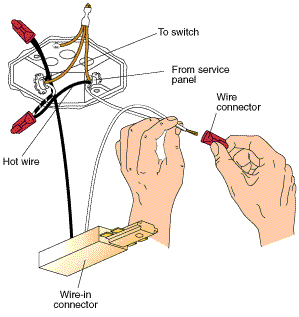
3. Wire the connector. Match wires from the
connector to the house wires: black to black and white to white (or white
marked black, if there’s only a switch loop in the box). Splice the wires
with wire connectors.
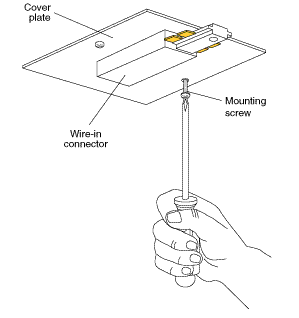
4. Secure the track to the ceiling. First, plug the
wire-in connector into the end of the track. Next, hold the track in position
on the ceiling and mark the ceiling through the mounting holes to show the
positions of the mounting screws. Drill holes at your marks and fasten the
track in place with toggle bolts, pushing the toggles through the ceiling
mounting holes until the toggles snap open inside the ceiling. If you hit a
stud with one or more of your mounting holes, use 1 1/2-inch flat-head wood
screws to anchor the track at that point.
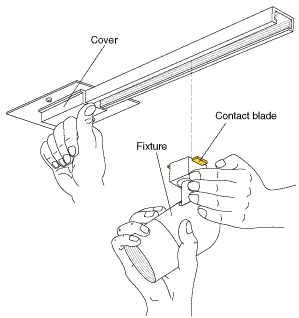
5. Attach the connector cover and install the
heads. Snap the cover in place over the wire-in connector and track end.
Mount each lighting head into the track by aligning its contact blades
parallel to the track, then rotating its base 90 degrees to lock the head in
place.
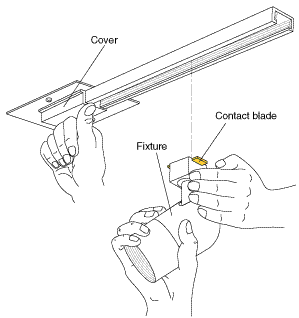
That done, turn on the power.
Switch the track lighting on and adjust the track heads to direct light where
you want it. It helps to have one person on a stepladder adjusting the heads
while another gives directions. To reposition a head along the track, simply
rotate it to unlock, slide it to its new position, then
rotate it again to lock. If the heads get too hot to touch, handle them with
potholders.
If there’s no ceiling outlet box where you want to install your track
lighting, a new electrical run must be added: usually a job for a licensed
electrician. Box or no box, you may not want to tackle track installation
yourself. But you can save some of the electrician’s time (and your money) by
selecting the lighting heads yourself.
Be sure that the electrician who makes the installation is licensed and
bonded and that his or her work meets the standards of local building codes.
You may save money by hiring an unlicensed individual to do the job, but you
won’t have much recourse if the work is unsatisfactory.
Be sure to get a written contract with your electrician that includes the
following:
-
Description of the
work to be completed with a detailed list of materials (brand name,
style, color of the unit or other specifications) to be used.
-
Cost of material and
all warranties that the manufacturer provides.
-
Cost of labor and
amount of deposit, if required.
-
Job installation date.
Liteharbor recommended tools & supplies:
Dirll , Dril bit, Track, Circuit, Tester, Wire, Connector, Screwdriver, Transfomer, Remote, Adjustable Wire Stripper, Toggle Bolt

 RESOURCE


